
Free shipping on orders 99$+
|
↓ Moshi |
 Premium Quebec Premium Quebec
|
Which eliquid to choose?
|
|
|
|
|
|
|
|
|
|
|
The DIY (Do It Yourself) principle |
|||
|
|
and get $5 off on your next purchase. Contests will also take place on our facebook page. |
 |
|
 DIY e-liquid tutorial
DIY means ''Do It Yourself''.
In the world of vape, DIY is also present, especially to cook your own e-liquids. You can actually create your own juice with flavors of your choice.
The first advantage is that you can create a personalized e-liquid with your favorite flavors.
The second advantage to create your own liquid is the cost. Indeed, a bottle of 10 ml will cost you between $ 1 and $ 1.30.
Moreover, with the DIY, you know exactly the components of the liquid that you vape.
Finally, have the satisfaction of creating your own recipes and try new flavor combinations to try new sensations.
But beware, it is not to mix flavors and bases randomly. You will need to show attention and manipulate nicotined base carefully and follow the recommended proportions of flavors.
To avoid risk of overdose, we offer ready-to-use bases so you simply have to add aromas to get your e-liquid.
We advise you to use gloves and goggles during your testing. Nicotine or aroma concentrates can be harmful in contact with skin.
We will explain step by step how to make your e-liquid.
The base is the main ingredient of your preparation. It is composed of Propylene Glycol (PG), Vegetable Glycerin (VG) and nicotine. Note that you can choose a nicotine-free base.
We offer 4 different proportions:
The PG promotes HIT (contraction of the larynx in the throat) while the VG brings the volume of steam exhalation. The Vegetable Glycerin also provides more lubricity, but tends to clog the atomizers more quickly.
Depending on your preferences, you can choose the right compromise for a vape that suits your needs.
To finish with the choice of the base, you need to select the strength of nicotine.
We offer 5 levels : 0mg; 3mg; 6mg; 12mg; 18mg.
The aromas will give taste to your e-liquids. You will mix them to your base to get your elixir.
Flavors are classified into 4 categories: Tobacco, Fruity, Gourmet, Fresh.
If you are new to DIY, we suggest you start with maximum 1 or 2 flavors to become familiar with the creation process.
But do not worry, with a little practice you will be able to make preparations with more aromas. Some people are mixing up to 8 or more flavors in their base with very precise recipes. If the liquid is well done, you can distinguish each flavor in the mouth.
There are two ways to dose your flavor:
We advise you to dose your aromas in ml. The accuracy is improved and the result also. The syringes of 1 ml are perfect for flavors.
The additives are optional in your preparations, but they have an essential role. They can improve or adjust the flavors to suit your tastes.
For example, the sweetener will sweet your e-liquid, koolada gives a fresh touch and vanillin balance the mixture of flavors.
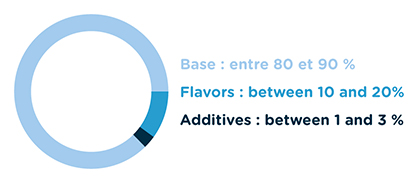
When you create your liquid, you should respect the proportions of flavor and additive you mix in your base. These proportions change according brands and types of flavors. This is why we advise you to refer to doses recommended by the manufacturers.
To help you make your recipes, we recommend a software specially developed for this: eJuice me up.
Now that you have your base, flavors and additives, you need the equipment to realize your e-liquid.
First, we insist to wear gloves and eye protection as you work to avoid contact with skin or eyes.
To accurately measure your base and aromas, we recommend using graduated syringes. For baes, syringe 5 or 10ml is perfect. For your flavors and additives, we advise you to take a 1 ml syringe. It will be more précised.
To transfer the PG and / or VG, equip yourself with a cup or beaker. You must also provide empty bottles and labels to record your recipes on the bottle. Admit it would be a shame to lose a recipe that you concocted and loved.
We recommend that you have a paper towel roll next to you as you work ;)
Now you have all you need for DIY, you can make your first creation.
To guide you, we suggest you follow the following steps. As an example is more explicit, we will make e-liquid Banana - Strawberry in a bottle of 10 ml.
Here is the recipe:
- Write your recipe on a notebook or on your computer (you can also save it in the software eJuice me up).
- Pour drops of aroma and additives in your empty bottle. For our recipe, you must pour 0.7 ml of Banana and 0.4 ml of Strawberry.
- Add your ready-to-use base to reach a total of 10 ml. In our case, you must pour 8.9 ml.
- Close your bottle and shake hard several times to mix the base and flavors.
- Stick your label on the bottle with name and date.
- Place the juice in a dark place for steepage.
Like wine, your newly created e-liquid needs time to release all its flavors and capabilities.
Steepering a liquid consist to place it in total darkness so the aroma molecules bind with the PG / VG base.
Depending on the type of fluids, the maturation time varies:
But nothing prevents you to taste your preparation time to time to assess maturation.
To test your liquids, you should equip yourself with a rebuildable atomizer or a dripper.

|
Informations |
 |
|
Support |
|
|
User guide |
Copyright © Le Vapologue 2014. All rights reserved - Creation of website : crealik


 Premium US
 Shipping
 Packages tracking
 FAQ
FAQ Secure payment